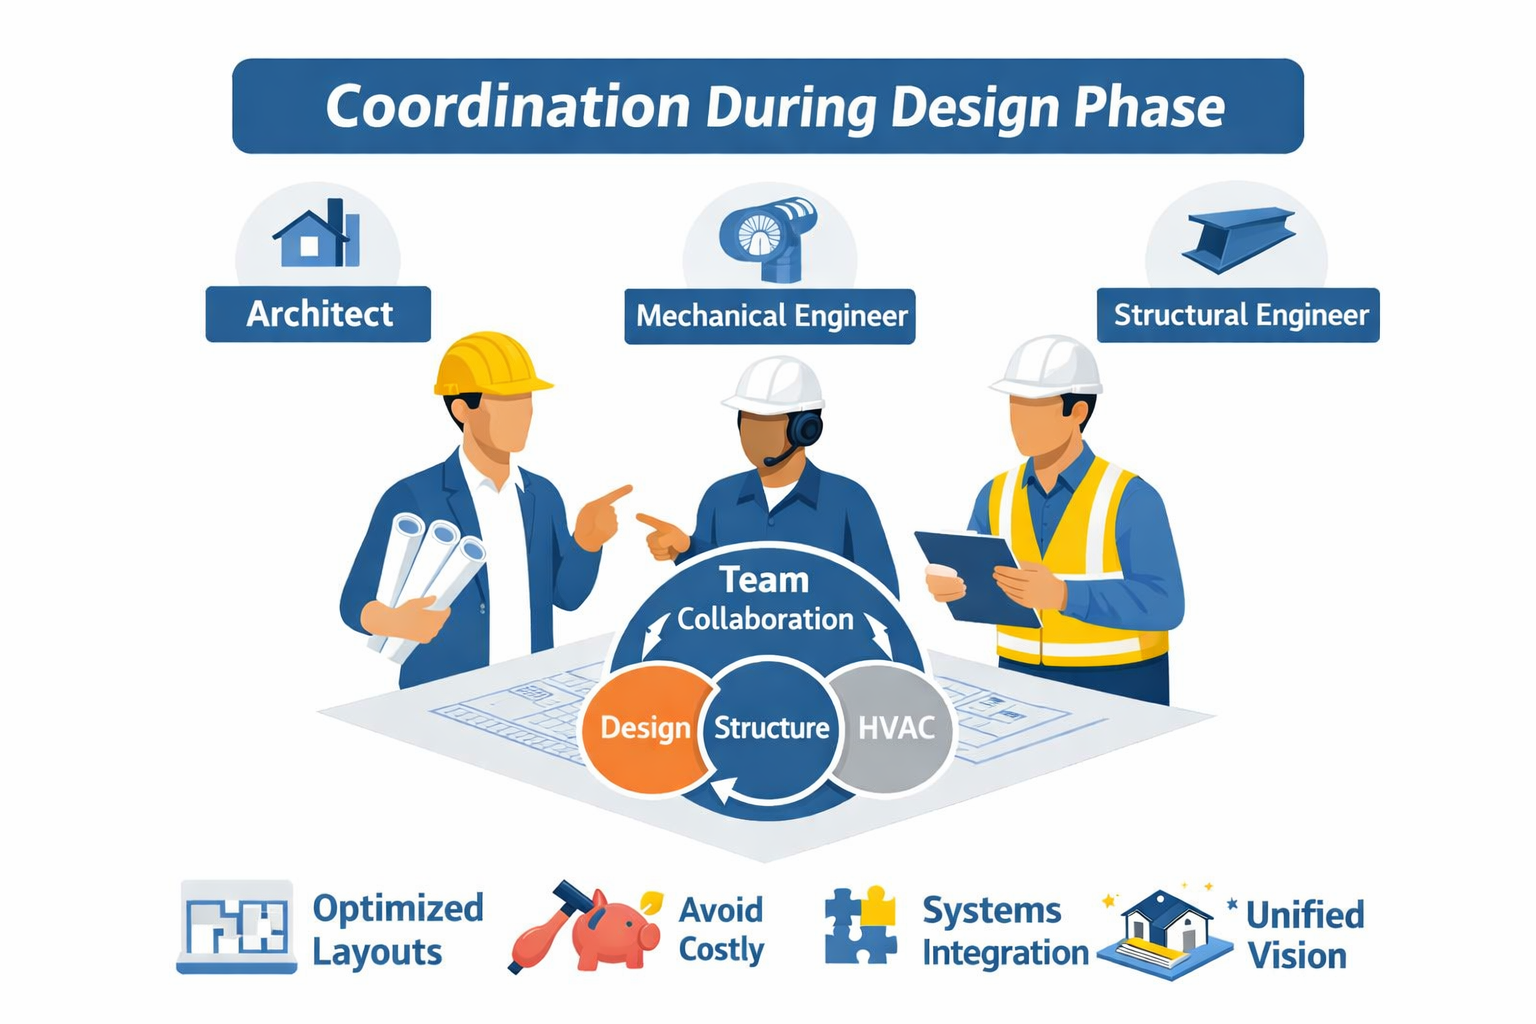
We’ve previously emphasized that proper detailing is one of the most critical aspects of building a custom home. As shown in the picture on the left, the correct way to finish the driveway paving is to extend it all the way to the garage door, creating a clean and continuous visual line. However, if the structural footing detail is not properly designed to accommodate the thickness of the paving, the garage slab may end up flush with the wall, leaving an awkward visual break.

This kind of oversight might be acceptable in rental or production-grade properties, where cost efficiency often outweighs precision, but it falls short of the standards expected in a custom-built home, where every detail contributes to the overall craftsmanship and aesthetic integrity.


In the construction industry, the term value engineering is used frequently and is often intended to give the project owner confidence that the design will be based on the least expensive acceptable methods. Before discussing this further, it is important to understand that building codes represent minimum requirements, not maximum standards. It is the engineer’s responsibility to design a project appropriately—never below code requirements, but above them when the project demands it.

Some engineers and contractors misinterpret this concept and claim that “designing to code” is equivalent to value engineering. We disagree. While minimum design may technically satisfy code requirements, each project has unique needs that must be considered.

A custom home must be designed to different standards than a rental property. What distinguishes these projects are the finishes, materials, and additional features incorporated during construction. For example the custom home is far more likely to include marble flooring, which requires stricter deflection criteria. Designing only to minimum code in such cases would be inappropriate and could lead to performance issues.

The following examples illustrate how some may label enhanced design as “over‑engineering,” when in reality the added considerations often come at zero or minimal additional cost compared to the long‑term value and performance they provide.

Example 1

The lateral (earthquake) load capacity of a wood shear wall is primarily based on the size and spacing of nails. A ½” thick plywood wall nailed with 8d nails at 6″ on center provides a load capacity of 260 plf, while using 10d nails at the same spacing increases the capacity to 286 plf—an increase of about 10%.

When a contractor bids on a project, they do not count the number or size of the nails. Based on their experience, they simply include a certain number of nail boxes. It is baffling why someone would specify a shear wall with 8d nails when it costs the client essentially nothing to achieve a stronger wall with 10d nails—unless the goal is to appear to provide value engineering.

Example 2

Consider a typical 2,000 sq. ft., two‑story house. If the floor is framed with 2×12 joists instead of 2×10, the cost difference will be roughly $2,000. With today’s construction costs, a 2,000 sq. ft. home may cost around $600,000, making the additional $2,000 only 0.34% of the total cost.

While a 2×10 floor system may be sufficient for carpeted floors, a 2×12 system provides significantly better performance for a minimal increase in cost.

Conclusion

Clear communication between consultants and the client is essential to understanding the intended use of the building. As mentioned above, a rental unit does not need to be designed to the same standards as a custom, owner‑occupied home. When higher performance is expected, designing only to minimum code is not value engineering—it is a missed opportunity to deliver long‑term quality at little or no additional cost.


When a contractor comes to a homeowner with ideas for cost savings, it’s tempting to say yes as soon as the word “savings” comes up. But it’s worth pausing before agreeing. Sometimes those savings aren’t fully passed along, and the contractor may be keeping a portion or suggesting a change that makes their own work easier or more profitable.

This is where the architect and engineer can help. While they don’t get involved in financial discussions, they can review the proposed change and confirm whether it’s appropriate, safe, and consistent with the design. Checking with them gives the homeowner confidence that the change makes sense from a technical standpoint and helps avoid surprises while keeping the project moving smoothly.

For example, the plans might specify a wood beam from manufacturer A, and the contractor may suggest switching to a beam from manufacturer B with the same listed strength (Fb value). Even if both beams have the same strength rating, their deflection characteristics (E value) may differ, and the alternate beam will bend more under the same loading condition. In many cases this may not be an issue, but in long-span conditions—such as beams over sliding doors—excessive deflection can lead to problems over time.

Fb = bending stress
E = modulus of elasticity

Starting construction without a licensed contractor or proper permits is one of the most expensive mistakes a homeowner can make. We’ve been called to many job sites where work was already underway—only to be shut down by the local building department due to missing permits. In nearly every case, the homeowner paid tens of thousands of dollars to correct violations. In one case, the cost exceeded $100,000.

A minority of contractors—especially unlicensed ones—try to justify skipping permits with lines like:

  • “Permits require plans, plans cost money, and the permitting process takes months.”

  • “Permits will raise your property taxes because the assessor will know of the improvements.”

  • “Everyone does it this way.”

  • “It’s a small job and can be done quickly.”

These explanations can sound appealing if you’re trying to save money or aren’t familiar with the construction process. But the reality is simple: skipping permits almost always costs far more in the long run.

What Can Go Wrong: A Real Example

In one case, a homeowner who wanted to enlarge their side yard was quoted $25,000 by an unlicensed contractor to cut into a hillside and build a retaining wall. A concerned neighbor noticed the work and contacted the building department.

What followed was a costly, year-long ordeal:

  • The homeowner had to hire an architect for design, our firm for engineering, and a geotechnical company to prepare a soil report.

  • The wall—built with improper footings and inadequate reinforcement—had to be demolished.

  • Because the property was on a hillside, the wall required deep foundations (caissons), not standard shallow footings.

  • The entire process took about a year and a half and cost roughly $100,000 on top of the $25,000 already spent—money that was effectively wasted.

Had the project been done correctly from the start—with proper plans, permits, and a licensed contractor—the total cost would have been significantly lower. What started as a $25,000 “deal” ultimately turned into a $125,000 mistake.

Why You Should Always Hire a Licensed Contractor and Obtain Permits

  • Work is completed safely, in compliance with building codes, and inspected by the local jurisdiction.

  • Licensed contractors are regulated, giving you legal protections.

  • Licensed contractors are required to carry workers’ compensation insurance and are bonded, providing financial recourse if something goes wrong or a worker is injured.

  • Permitted work is documented, which helps protect your property value.

  • Unpermitted work can delay or derail a future home sale and may create issues with insurance claims.

Know Your Local Requirements

This article is not legal advice and is intended for general informational purposes only. Building and contractor requirements vary by state and city. Before starting any construction project, check with your local building department and your state’s contractor licensing board to ensure you are following all applicable laws and permit requirements.

The short answer is that for some inspections, yes—but for others, definitely not. To understand why, it helps to look at the three most common types of inspections involved in a construction project.

1. Building Inspector

The first type of inspection is performed by the building inspector from the local jurisdiction. Their primary responsibility is to verify that construction is proceeding in accordance with the approved plans and that the work complies with the applicable provisions of all relevant building codes. These inspections are typically provided at no charge by the responsible jurisdiction as part of the permitting process.

2. Deputy Inspector (Special Inspection)

The second type of inspection is known as special inspection, often performed by a deputy inspector. Special inspections are required for certain critical or specialized construction activities, particularly those related to seismic performance. Examples include welding, anchor installation, high-strength bolting, and other structural components.

The role of the special inspector is to verify that materials and installation—including nails, bolts, hardware, and other structural elements—are installed in accordance with the approved plans, the applicable code requirements, and the manufacturer’s specifications.

Section 1704.2 of the California Building Code requires that special inspectors be retained by the owner or the owner’s representative. The intent of this requirement is to maintain independence and avoid potential conflicts of interest. For example, if a special inspector identifies work that requires costly corrections, a contractor might otherwise be reluctant to continue working with that inspector. Having the inspector retained by the owner helps ensure objectivity and integrity in the inspection process.

3. Engineer of Record (Structural Observation)

The third type of inspection is performed by the engineer of record and is formally referred to as structural observation. The purpose of structural observation is to confirm that the structural system is being constructed in general conformance with the approved structural plans and design intent.

Similar to special inspectors, structural observers are retained by the owner, and their primary responsibility is to represent the interests of the project owner and verify that the structural design intent is being followed.

California Building Code – 1704.2 Special Inspections and Tests
Where application is made to the building official for construction as specified in Section 105, or 1.8.4, as applicable, the owner or the owner’s authorized agent, other than the contractor, shall employ one or more approved agencies to provide special inspections and tests during construction on the types of work specified in Section 1705 and identify the approved agencies to the building official. These special inspections and tests are in addition to the inspections by the building official that are identified in Section 110.

We are often asked whether a new house will be earthquake‑proof. It’s an understandable question. Homeowners want reassurance that their investment and their family will be safe. But the honest answer is no, your house is not earthquake proof. Modern building codes are not intended to guarantee that a structure will remain undamaged or fully functional after a major earthquake. Instead, the primary goal is life safety.
 
Seismic design requirements focus on preventing collapse. A properly engineered home should remain standing even during a severe earthquake, giving you the ability to survive the shaking and safely exit the building. Damage may still occur—cracked walls, broken finishes, or shifted contents—but the structure itself should not fail. A well‑designed, code‑compliant house is intended to keep you safe, avoid catastrophic structural failure, and remain standing afterward. It may still require repairs depending on the severity of the event, but its primary purpose is to protect the people inside. A helpful way to think about it is to compare it to a car’s crumple zones: the vehicle may deform during a collision, but that controlled deformation is what protects the occupants.
 
Designing a structure that could withstand every possible earthquake without any damage would be extraordinarily expensive and may not even be possible. Instead, buildings are designed to perform well under code‑defined seismic forces.

While cutting costs on a soil report may seem appealing at the outset of a project, it often leads to increased expenses during the construction phase. Inexpensive or overly generic reports typically rely on conservative, code-minimum values that prioritize caution over precision. This approach can result in unnecessarily larger footings, additional reinforcement, and other structural measures that may not be required based on the actual site conditions.

In contrast, a comprehensive and well-executed geotechnical investigation provides the engineering team with accurate, site-specific data, enabling the development of an optimized design. While the initial cost of a detailed soil report is higher, it is typically a small fraction of the savings realized through more efficient design and streamlined construction.

A Real-World Example

To illustrate the practical difference, here are two examples from our own projects. Both involved basements measuring 85 ft by 70 ft and were located near each other. In one case, the recommended allowable soil pressure resulted in basement wall reinforcement of #6 bars at 9-inch on center, while the other required #7 bars at the same spacing.

The recommendations from the second report resulted in approximately 2 additional tons of reinforcing steel, not including the added labor costs or potential increase in footing dimensions.

The Bottom Line

Not all soil reports are equal. A high-quality geotechnical report should not be viewed as an added expense, but rather as a cost-saving investment during construction. While the difference may be minimal for projects on flat, undisturbed land, it becomes critical for more complex projects, such as those involving basements, retaining walls, or hillside construction.

The intent of this page is to clarify the application of ACI’s Section 17.10.5.3 requirements for the installation of post-installed hold-down anchors using epoxy. Four options are provided for determining the required anchor or attachment strength to protect against non-ductile tensile failure. We will discuss Options A and D, which are generally applicable to hold-down anchors.

A quick summary of Options A and D:

Option A:
  • The concrete-governed strength shall be greater than the steel strength of the anchor.
  • The steel strength shall be taken as 1.2 times the nominal steel strength of the anchor.
  • The concrete-governed strength shall be taken as the nominal strength considering pullout, side-face blowout, concrete breakout, and bond strength as applicable.
  • Anchors shall transmit tensile loads via a ductile steel element with a stretch length of at least 8da unless otherwise determined by analysis.
Option D:
  • Anchors or anchor groups must be designed for the maximum tension obtained from factored load combinations that include seismic loads (E), with the seismic load (Eh) increased by an over-strength factor (Ωo).

Our example is for a:

  • Strength level hold-down force of 2000 lb
  • Normal weight 2500 psi cracked concrete
  • No supplemental edge reinforcement
  • 2×4 stud wall
  • SIMPSON® SET-3G or HILTI® HIT-HY 200

Epoxy Anchor Results For Option A

All values are in strength level unless noted otherwise.
Steel Strength (lb)Bond Strength (lb)Concrete Breakout Failure (lb)
Simpson15732121377903 (Governing)
Hilti15732103457903 (Governing)
ACI's ductility requirements are not met since the governing design strength is not steel.


Epoxy Anchor Results For Option D

All values are in strength level unless noted otherwise.
Steel Strength (lb)Bond Strength (lb)Concrete Breakout Failure (lb)
Simpson983359173852 (Governing)
3852/(2.5x1.4)=1100 lb ASD Capacity
Hilti983250433852 (Governing)
3852/(2.5x1.4)=1100 lb ASD Capacity
ACI's ductility requirements  are met since anchors designed for maximum tension force include the over strength factor.
In our opinion, using epoxy anchors at existing footings does not provide any reasonable, code compliant tension force generally required for anchor bolts, and other anchorage methods should be used.